Showing posts with label Recipes. Show all posts

Thursday, November 5, 2015

Heat up your next tailgate….Fireball Spicy Nuts Recipe

Are you going to a tailgate? Party? Holidays? 
How about a fun party snack idea!
this post was supposed to be a fun "Nut" idea for a tailgate or game day and it turned into a great new recipe. Bring this as a gift or celebrate with friends at your next tailgate…Go Team Go!


FIREBALL SPICY NUTS

Ingredients
1lb or nuts (I used walnuts and almonds)
1/2 cup sugar
2 tablespoons melted butter
1/2 cup Fireball Whiskey
1 teaspoon vanilla

Instructions
preheat oven to 350
line a cookie sheet with parchment paper
mix butter, sugar, whiskey and vanilla and nuts
spread nuts on cookie sheet and bake 20 minutes


Go to Nuts.com for other Heathy and Quick Snack Ideas with Nuts!
Happy Snacking!


Saturday, June 14, 2014

Melted Crayon Style Melted Cake

If you haven't seen melted Crayon Art (LInk for tutorial Below)
It's everywhere on Pinterest....
Here is an awesome Melted Crayon Cake 
click here for tutorial for Cake made by Tablespoon.com

and here is an easy tutorial for Melted Crayon Art.
Click Here for art made by Glorious Treats.com


Wednesday, February 26, 2014

Mardi Gras Monkey Bread (Better than King Cake!)

It's almost Mardi Gras time (next week to be exact)...time to get ready to celebrate!
SpicySouthernKitchen.com shares her super yummy idea!

Monkey Bread is awesome on it's own, now add frosting and sprinkles Mardi Gras style!
Her recipe is very easy using refrigerated biscuits and is super yummy!!!

Traditional King Cakes are very dry and are basically bread with icing, this monkey bread is sweet and good all the way through. You can always add the traditional plastic baby to this cake. The tradition is a small plastic baby, representing baby Jesus, is baked inside the cake. Whoever gets the piece of cake with the baby, is supposed to provide the cake for the next get together.

Click HERE for recipe.

Laissez les bons temps rouler!

(Let the good times roll)


Monday, November 11, 2013

Inside Out Carmel Apples

Inside out Carmel Apples
I originally saw this  on the Pinterest and love this idea. There is many different variations, I found this one from Better Half Weddings.
Click here for Recipe and instructions!
Yummy!!!!


Monday, October 14, 2013

Skull Cake and recipe


This was a practice run for Halloween...Skull Cake!!!

I used this recipe from Wilton included in the box:

Pumpkin Pound Cake
Ingredients:

3 cups all-purpose flour
1 teaspoon baking powder
1 teaspoon ground cinnamon
1/4 teaspoon salt
1/8 teaspoon ground nutmeg
1 cup (2 sticks) butter , softened
2 cups granulated sugar
4 eggs , at room temperature
1 teaspoon pure vanilla extract Easy-Add pure vanilla extract Add to shopping list pure vanilla extract
1-1/2 cups canned pumpkin (not pie filling)

Instructions:

step 1
Heat oven to 325º F. Spray Dimensions® Skeleton Pan lightly with vegetable pan spray with flour. Place Skeleton Pan onto baking sheet.

step 2
In small bowl, combine flour, baking powder, cinnamon, salt and nutmeg. In large bowl, beat butter and sugar until light and fluffy. Add eggs one at a time, mixing well after each addition; beat in vanilla. Add flour mixture alternately with pumpkin; mix well. Pour batter into prepared pan.

step 3
Bake 65-75 minutes or until toothpick inserted in center comes out clean. Cool 15 minutes in pan. Turn onto cooling rack. Cool completely before serving.

BTW All the cool Halloween Pans are on sale at JoAnn Fabrics for 50% off!


Monday, June 24, 2013

4th of July Sangria


Sangria 4th of July Style!

White Wine
strawberries
Blueberries
pineapple cut into star shapes
club soda or sprite


Friday, June 21, 2013

4th of July Firecracker Cookies

Firecracker Cookies

These beautiful cookies are from Cookin' Cowgirl...click here for her full tutorial!

   makes 30-32 cookies
1 box french vanilla cake mix, 18.25 oz*
1 tsp baking powder
2 eggs
1/2 C vegetable oil
1/2 tsp vanilla extract
1/2 C red sprinkles
1/2 C blue sprinkles

Preheat oven to 350 degrees. In a large bowl, mix together the cake mix and baking powder. In a small bowl, mix together the eggs, oil and vanilla. Add the egg mixture to the cake mixture and stir to combine. Stir in the sprinkles. Drop by spoonfuls onto a cookie sheet or silpat.

Bake for 10 minutes. Allow to cool for 5 minutes on the baking sheet before transferring to cooling rack. The cookies will be very soft at first. Cool and enjoy! 


Wednesday, April 17, 2013

Earth Day Rice Krispie treats

Earth Day Rice Krispie Treats

Basically, just your basic rice krispie squares recipe with food coloring added.

1/4 cup margarine
40 regular marshmallows
1/2 tsp. vanilla
6 cups rice krispies
green and blue food coloring

Melt margarine and marshmallows over medium heat in a large pot, stir in vanilla and rice rispies.  

Divide into two bowls

Add green food coloring to one bowl and blue food coloring to the second.

Stir

 Take a scoop from the blue bowl and a scoop from the green bowl and mash them together in a ball (the earth).

Set the balls aside until completely cool.

remember Everyday is Earth Day!
recycle-reduce-reuse
xoxo

photo: Pinterest


Saturday, February 23, 2013

Happy Birthday Cookies

I heart Sprinkles!!!

Cookin' Cowgirl made these extra fun cookies!!!
I love the multi colored sprinkles but you could use red and pink for Valentine's Day, Green for St. Patty's Day...Red and Green for Christmas.....
Birthday Cookies
    makes 30-32
1 box vanilla cake mix, 18.25 oz
1 tsp baking powder
2 eggs
1/2 C vegetable oil
1/2 tsp vanilla extract
1 C color sprinkles

Preheat oven to 350°. In a large bowl, mix together the cake mix and baking powder. In a small bowl, mix together the eggs, oil and vanilla. Add the egg mixture to the cake mixture and stir to combine. Stir in the sprinkles. Drop by spoonfuls onto a cookie sheet.

Bake for 10 minutes. Allow to cool for 5 minutes on cookie sheet before transferring to cooling rack. They will be very soft at first. 
Cool and enjoy!


Friday, February 8, 2013

Easy Heart Brownies for Valentine's Day

These Brownie Hearts are from Betty Crocker.com and look so Easy and Beautiful!

Ingredients:
1 box Betty Crocker® fudge brownie mix
Water
vegetable oil
 eggs called for on brownie mix box
1container Betty Crocker® Rich & Creamy chocolate frosting
Betty Crocker® Decorating Decors multicolored candy sprinkles or colored sugar

Directions:
Heat oven to 350°F. Line bottom and sides of 13x9-inch pan with foil. Grease foil on bottom only of pan with shortening or cooking spray. Make and bake brownie mix as directed on box. Cool completely, about 1 hour.

Using foil to lift, remove brownie from pan; remove foil. With deep 2 1/2-inch heart-shaped cookie cutter, cut 14 brownies. Place brownie hearts on a cooling rack or waxed paper.

In microwavable bowl, microwave frosting uncovered on High 10 to 30 seconds. Stir; frosting will be thick and spoonable. DO NOT BOIL. Carefully spoon melted frosting over brownies to glaze, allowing excess to drip down sides. Sprinkle with candy sprinkles before frosting sets.

Tips for Decorating:
Mix 1/4 cup Betty Crocker® Rich & Creamy vanilla frosting and enough red food color to a make a pink frosting in a microwvable bowl. Microwave on High 10 seconds. Drizzle over chocolate-glazed hearts.


Sunday, January 6, 2013

Red Velvet Brownies

Time to kick off my Favorite holiday...Valentine's Day xoxo

Let's get it started right with "Red Velvet Brownies with White Chocolate Icing"

Recipe from Smells Like Home

Red Velvet Brownies with White Chocolate Buttercream Frosting
source: adapted from How Sweet It Is

For the brownies:
3 tbsp unsweetened cocoa powder
1 oz red food coloring (or a scant 2 tbsp)
2 tsp pure vanilla extract, divided
1/2 cup (8 tbsp) unsalted butter, at room temperature
1 1/2 cups granulated sugar
2 large eggs, at room temperature
1 1/4 cups all-purpose flour
1/4 tsp salt

For the white chocolate buttercream frosting:
1/2 cup (8 tbsp) unsalted butter, at room temperature
2 1/2 cups powdered sugar
1 tsp pure vanilla extract
4 oz good-quality white chocolate (not chips), melted – I recommend Callebaut
1 – 2 tbsp heavy cream

To make the brownies:
Preheat the oven to 350 degrees F.  Butter and flour an 8″x8″ baking pan.

In a small bowl, slowly stir together the cocoa powder, food coloring, and 1 tsp vanilla into a thick paste until no lumps of cocoa remain. Set aside.

In the bowl of a stand mixer fitted with the paddle attachment, beat together the butter and sugar on medium speed until light and fluffy, about 2 minutes.  Add eggs one at a time, mixing well after each addition, then stir in the remaining 1 tsp of vanilla.  With the mixer off, add in the cocoa mixture, then turn the mixer to medium and beat the two mixtures together until they are one uniform color.  Slowly add in the flour and salt and mix on medium-low speed, just until combined.  Do not overmix.

Remove the bowl from the mixer and stir up the batter with a rubber spatula once or twice just to ensure all of the flour has incorporated from the sides of the bowl and there isn’t anything stuck on the bottom of the bowl.  You’ll want one uniformly colored (red) batter.

Pour the batter into the prepared pan and bake for 30-40 minutes or until a toothpick comes out clean when inserted into the center of the brownies.  Allow brownies to completely cool in the pan on a baking rack, about 45-60 minutes.  Frost brownies in the pan, cut into 12 bars, and serve, or remove the entire batch from the pan to a cutting board, cut into 12 bars, frost, and serve.

To make the frosting:
In the bowl of a stand mixer fitted with the paddle attachment, cream butter until soft and fluffy then beat in the vanilla.  With the mixer on low speed, slowly add in powdered sugar 1/2 cup at a time; allow the sugar to mix in before adding the next 1/2 cup. Once all of the sugar has been added, beat on medium speed for 30 seconds and scrape down the sides of the bowl.  Add in the melted white chocolate and beat on medium speed until incorporated.  With the mixer on low, add in heavy cream 1 tbsp at a time and beat at medium speed until the frosting has reached your desired consistency.




Tuesday, January 1, 2013

A Sweet Start to 2013

Cake Batter Pancakes 

Ring in the New Year with
these festive pancakes!


Pancakes
1 cup Original Bisquick® mix
1 cup Betty Crocker® SuperMoist® yellow cake mix
3 tablespoons candy sprinkles
1 cup milk
1teaspoon vanilla
2 eggs

Glaze and Garnish
2 1/2cups powdered sugar
3tablespoons plus 2 teaspoons milk
1teaspoon vanilla
Additional candy sprinkles

Step 1
Heat griddle or skillet over medium-high heat or electric griddle to 375°F; grease with cooking spray, vegetable oil or shortening. (Surface is ready when a few drops of water sprinkled on it dance and disappear.)
Step 2
In medium bowl, stir together pancake ingredients until blended. Pour by slightly less than 1/4 cupfuls onto hot griddle. Cook until edges are dry. Turn; cook until pancakes are golden brown. Stack on serving plates.
Step 3
In small bowl, beat powdered sugar, milk and 1/2 teaspoon vanilla with whisk until smooth.
Step 4
To serve, top each serving with glaze and additional candy sprinkles.

source: Betty Crocker and from Blogger, Lil Miss Bossy


Thursday, October 25, 2012

"Scream Cheese" Brownies

I LOVE the Name!
"Scream Cheese" Brownies!!! LOL
I am sold not only because of the name but look at the picture...YUM!
These easy to make Brownies are from Betty Crocker.
Actually, these beautiful brownies inspire me for fall, not just Halloween, these could be used for a fun Thanksgiving Dessert as well. Brown and Orange look great together!

Ingredients:

Filling
4 oz each cream cheese, softened (from 8 oz package)
1 egg
3 tablespoons sugar
4 drops red food color
4 drops yellow food color
1/4 teaspoon vanilla
Brownies
1 box (1 lb 2.4 oz) Betty Crocker® Original Supreme Premium brownie mix
Water, vegetable oil and egg called for on brownie mix box


Heat oven to 350°F (325°F for dark or nonstick pan). Grease bottom only of 9-inch square pan with shortening or cooking spray. In small bowl, beat filling ingredients with electric mixer on low speed until smooth. Set aside.

Make brownie batter as directed on box. Spread 3/4 of brownie batter in pan. Spoon filling by tablespoonfuls evenly onto brownie batter. Spoon remaining brownie batter over filling. For marbled design, pull knife through batter and filling in wide curves; turn pan and repeat, if desired.

Bake 40 to 44 minutes or until toothpick inserted 1 inch from side of pan comes out almost clean. Cool completely at room temperature, about 1 1/2 hours. Refrigerate at least 1 hour until chilled. For brownies, cut with plastic knife into 4 rows by 4 rows. Store covered in refrigerator.

source and recipe from: BettyCrocker.com


Wednesday, October 10, 2012

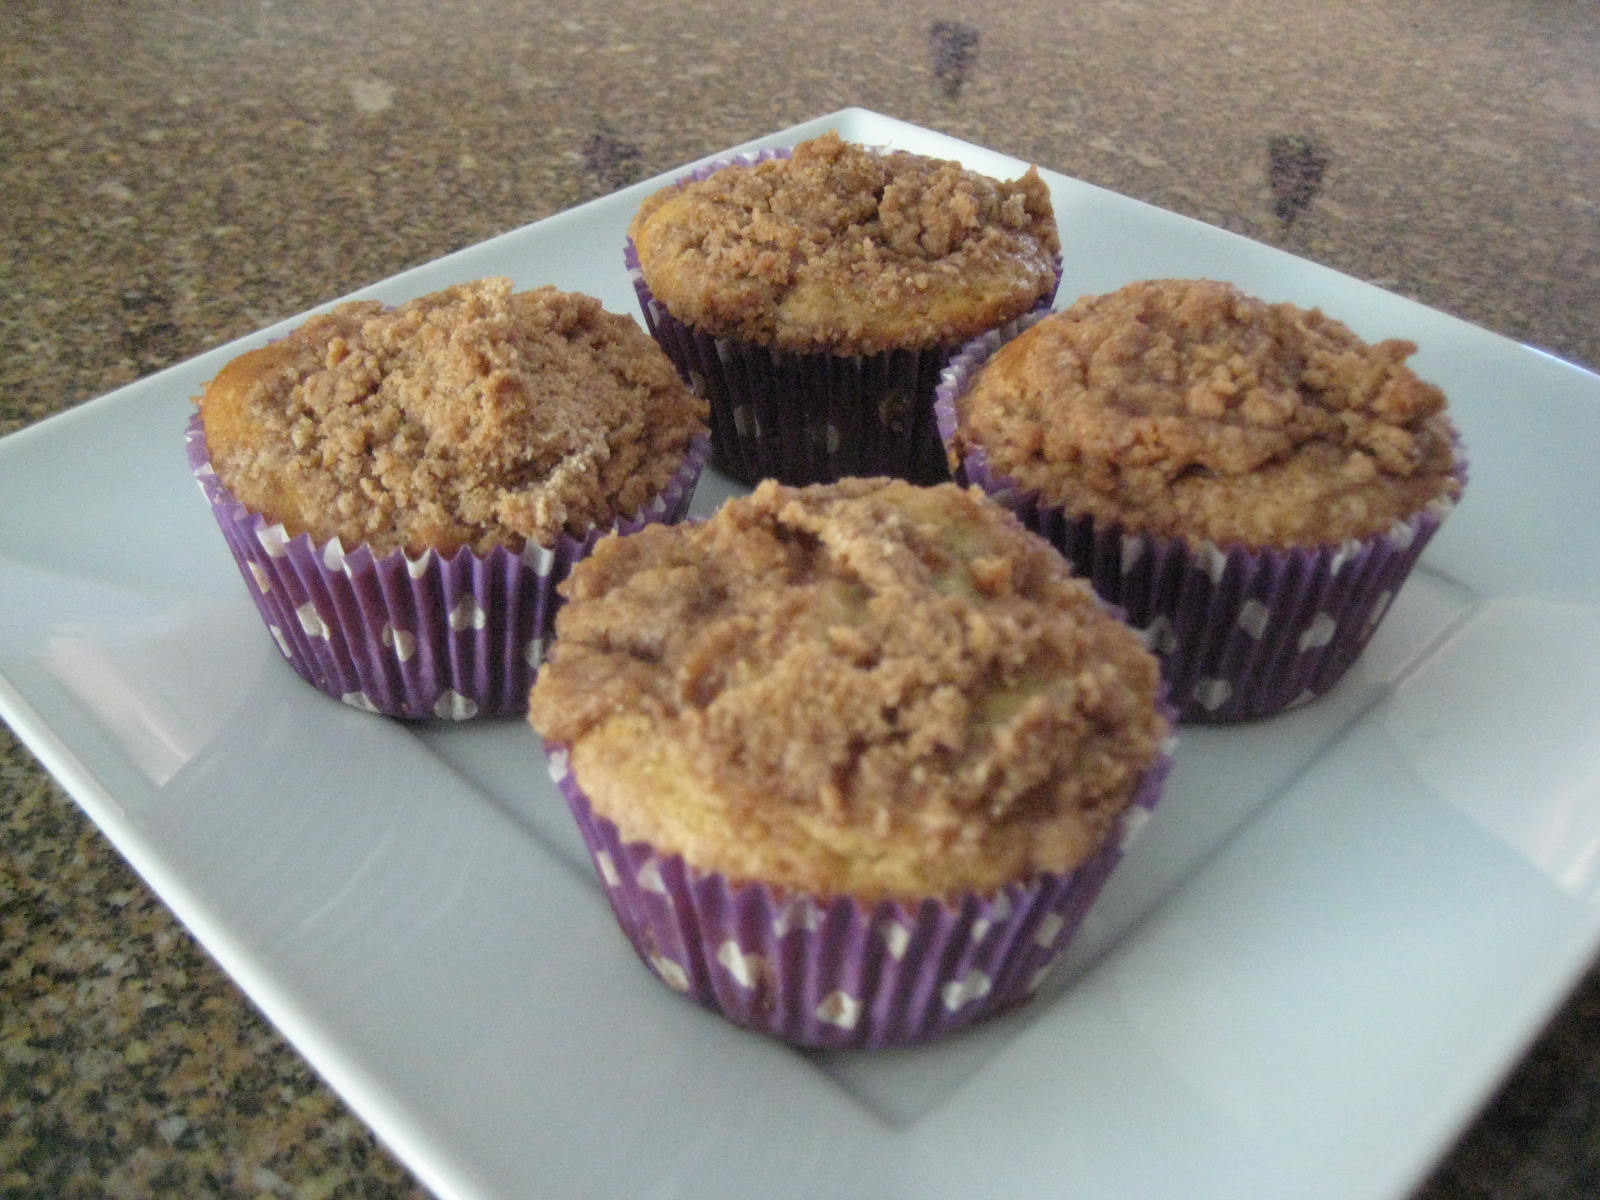
Banana Nut Muffins with Streusel Topping

I know, my photography doesn't do these justice...
But take my word they are Easy and DELICIOUS!

What do you get when you cross Banana Bread with Cinnamon Coffee Cake?
That's right Banana Muffins with extra yummy flavors...

This is a simple one bowl method and you can mix them up and have them baked in around 30 minutes

Breakfast, lunch or an afternoon snack, these always hit the spot.
Makes 18 Muffins

Cinnamon Streusel

Ingredients:
1/2 cup  Flour
1/2 cup Light Brown Sugar, lightly packed
4 tablespoons butter, softened
1 1/2 tsp Ground Cinnamon
Pinch of Salt

Banana Muffins

Ingredients:
2 cups  Flour
3/4 cup Sugar
1/2 tsp Baking Powder
3/4 tsp Baking Soda
Pinch of Salt
1/3 cup Vegetable Oil
2 Large Eggs, lightly beaten
1/2 cup Milk (any kind)
1 tsp Vanilla 
3 large Ripe Bananas, mashed
1/2 cup Roasted Pecans or walnuts,  chopped 

Directions for Streusel:
Lightly whisk together dry ingredients in a bowl
Add the softened butter and rub into dry ingredients with your fingertips
Refrigerate until needed

Directions for Muffins:
Preheat oven to 350 degrees
(while the oven is heating up toast the nuts until slightly browned)
Line a muffin pan with liners
In a large bowl whisk together the dry ingredients excluding the pecans or walnuts
In a small bowl  combine the wet ingredients excluding the banana
Add the wet ingredients to the dry and mix together until just combined
Stir in the mashed bananas
Gently fold in the pecans
Spoon the batter into liners

Add Streusel to top of Muffins
Break up any large clumps of streusel mixture with a fork and sprinkle mixture on to batter
Bake until top of muffins spring back when lightly pressed, about 25mins 
Remove from oven and leave to cool for 10-15mins before removing muffins from tray and cooling on a wire rack
Enjoy still warm or compeltely cooled!


just added streusel topping! 
yummy...can you smell the cinnamon?


Tuesday, August 21, 2012

Back to School Party and Alphabet Rice Krispy Treats

A Fast and Easy Back to School Celebration.
I used chalkboard fabric (from JoAnn's) on table, some books and a some school supplies in Ball Jars.  I made some cupcakes and Alpha- Bits Cereal Rice Krispy Treats (recipe at bottom of post)

 Easy Apple Cupcakes
They are Vanilla cupcakes rolled in red sprinkles, add a pretzel stick for stem, then I cup up a green fruit slice for the leaf.
simple and beautiful!!!!!

Neon school supplies are an inexpensive way to make your table "pop"...


Alpha -Bits Rice Krispy Treats

Ingredients:
3 tablespoons butter or margarine
1 package (10 oz., about 40) regular marshmallows
- OR -
4 cups miniature marshmallows
4 Cups Alpha- Bits Cereal
2 cups Kellogs Rice Krispies Cereal

Instructions:
 In large saucepan melt butter over low heat. Add marshmallows and stir until completely melted. Remove from heat. 

2. Add cereal. Stir until well coated.

3. Using buttered spatula or wax paper evenly press mixture into 13 x 9 x 2-inch pan coated with cooking spray. Cool. Cut into 2-inch squares. Best if served the same day.


MICROWAVE DIRECTIONS:
In microwave-safe bowl heat butter and marshmallows on HIGH for 3 minutes, stirring after 2 minutes. Stir until smooth. Follow steps 2 and 3 above. Microwave cooking times may vary.


Tuesday, July 24, 2012

Olympic Torch Cupcakes

It’s not easy to be a torch bearer. You have to be nominated and only 8000 people in the UK were chosen this year. Oh, and you have to be inspirational…or something...
These “torches” are much easier to handle…and much tastier! They are sugar cones filled with a cake pop mixture with a fiery vanilla icing. You’re totally inspirational, so try one today!


Ingredients:
1 box of cake mix, plus whatever ingredients  are required by the mix (I used chocolate, but feel free to use whatever you prefer)
16 ounces of frosting that complements the cake mix (I used chocolate frosting for chocolate cake)
16- 24 sugar cones
16 ounces of vanilla frosting
Red, orange, and yellow food coloring
Pastry bag and 1M tip

1. Prepare the cake mix according to the package directions. Cool completely.
2. Crumble the cake into a large bowl. Add 16 ounces of your choice of frosting and mix well.
3. Gently spoon the cake mixture into a sugar cone. You don’t want it to break! Fill cone to the top, slightly mounded.

4. Divide the vanilla frosting into two bowls. Dye half of the frosting red and half of the frosting yellow.
 Holding the sugar cone in one hand, place the icing tip in the middle of the cone, squeeze, and pull away.
Keep it up until the top of the cone is covered with frosting.
6. Storing these suckers could be a challenge! I would recommend making these the same day you will serve them. You could refidgerate them overnight if needed. Their shape makes them a bit difficult to display, but I found this super cute idea for using an egg carton. You could also use wine glasses or a cupcake stand for serving.
pretend these are Olympic Torches!

awesome Tutorial, Photos and Source: Not Your Momma's Cookie!