Wednesday, June 29, 2011

4th of July Desserts!

Yes, more 4th of July ideas...
I can't stop...so many red, white and blue ideas...all of these ideas can be used for other parties, just change the colors to fit the party of your choice...

Here are some MORE Dessert Ideas, these are from BettyCrocker.com
this cake is beautiful and easy, cake mix divided into three bowls, food coloring and prepared icing with food coloring! (This is what I am making!!!) click here for Firecracker cake

I love this idea, they baked the brownies in cupcake wrappers, then cut in half and added ice cream and sprinkles.


Monday, June 27, 2011

More 4th of July Ideas!


Red White and Blueberry Skewers
This cute idea is from MakeandTakes.com
These festive 4th of July skewers are the perfect treat for your upcoming holiday party. They’re a great snack for little hands to help with, and they make a colorful treat for the table.

Supplies for 4th of July Kabobs:

skewers, these are 10 inch
strawberries, cut up in 4ths
mini marshmallows
blueberries


Red White and Blue "Lollies" 
These fun paper crafts get the nickname “Lollies” because they look like giant lollipops. With so many darling double sided papers available these days, you can really have fun with these. They would look great as a centerpiece at your 4th of July BBQ. You can also vary the sizes of these lollies.

This tutorial is from Makes and Takes.

Click here for complete directions.
Supplies for Paper Lollies:

1 12×12 inch paper, cardstock
glue dots or double sided tape
scoring tool, optional
hot glue gun
How to make Paper Lollies:

1. Cut a 12×12 piece of paper into 3- 4×12 strips.
2. Fold the strips accordion style at about 1 inch apart back and forth (1/2 inch fold are great for smaller lollies). To assure straight lines, a scoring tool is helpful but not necessary.
3. Using glue dots or double sided tape stick all three strips together forming a circle.
4. Hold the circle to lay flat and add a big drop of hot glue to hold it together.


The weight of a heavy can is helpful as the hot glue dries.


Once your lollie is made, get creative! You can layer smaller medallions (lollies) on top (like you see above) and top with some of these different patriotic embellishments to make it look more finished.
Finished off with cylinders filled with candy, it will be everyone’s favorite centerpiece.


And another banner idea similar to the Easter Egg Garland made from paint chips..

A Red White and Blue Paint Chip Garland!


paint chips in red, white and blue 
scissors
cardboard to cut out a star-shaped template
sewing machine (optional)
white thread
double-sided tape for hanging

I used 21 paint chips total, 7 of each color. Don't worry if some of the red paint chips look pink--you will get the overall look of red, white and blue when it all comes together.

First you want to make yourself a star-shaped template out of your piece of cardboard. I traced one of Little Sweet's star shapes from a foam puzzle, then tweaked the size a bit to fit 2 stars on each paint chip. You could also draw your own or print out a star shape from Photoshop.


They used a sewing machine to sew the paint chips together, I personally would just use glue dots or glue to attach to ribbon.

The last few blog posts have given you some great suggestions and ideas to celebrate the 4th of July or any Patriotic Holiday (Memorial Day, Election Day, etc...)
Don't forget those special "creative" details make any event a memorable one...

Love is in the details!!!!

p.s. your thoughts and ideas are always welcomed....


Sunday, June 26, 2011

Flag Cake and Tutorial

This amazing cake is originally made by 17 and Baking.
She said it was originally her father's idea but she did an amazing job.
There are many other flag cakes in the" Bloggy World" but I found another tutorial
That used a cake mix and gave information with a diagram  for constructing this cake.


This  cake was made with two boxes of white cake mixes and food coloring.
click here for the complete tutorial found at So wonderful So Marvelous


Here is another tutorial for a cake made from scratch
This tutorial was found at Delectable Deliciousness.blogspot,com

The recipe sounds delicious for any cake

This recipe is found at Delectable Deliciousness 
and copied here....

To start, you need 3 layers of cake (red, white and blue, obviously). Dorie's recipe makes a 2 layer 9-inch round cake, so I made one and a half batches to get my 3 layers. Instead of making all the cake batter at once, I made the full batch first and once that was done baking, made the half batch. This worked out really well for me as I only have two 9-inch round cake pans and can only fit those two in my oven at a time.

One good thing about Dorie's recipe is that the batter is very well mixed - this helps when having to add food coloring to your batter. There was no danger of overmixing and having a deflated cake.

Perfect Party Cake
from Dorie Greenspan's "Baking: From My Home to Yours"

2 1/4 cup cake flour
1 tablespoon baking powder
1/2 teaspoon salt
1 1/4 cups whole milk or buttermilk (I used buttermilk)
4 large egg whites
1 1/2 cups sugar
2 teaspoons grated lemon zest
1 stick (8 tablespoons) unsalted butter, room temperature
1/2 teaspoon pure lemon extract

1. Preheat oven to 350°F. Spray two 9-inch round cake pans with non stick spray. Optional - line the bottoms with a round of parchment. If using, also spray the parchment with non stick spray.

2. Sift together flour, baking powder and salt. Set aside.

3. Whisk together the milk and egg whites in a medium bowl. Set aside.

4. In the bowl of your electric mixer, combine the sugar and lemon zest and rub the lemon zest into the sugar with your fingers until well incorporated. The mixture will become moist and very fragrant.

5. Add the butter to the sugar/zest mixture and, using the paddle attachment, beat on medium speed for a full 3 minutes. Add the lemon extract and 1/3 of the flour mixture; add 1/2 of the milk/egg white mixture and continue to beat at medium speed, then add half of the remaining flour mixture, then the rest of the milk/eggs and finish with the remaining flour. Once all ingredients are combined, beat the batter for a good 2 minutes to ensure it is thoroughly mixed and well areated.

6. Pour into prepared pans and bake for approximately 30 minutes, or until a toothpick inserted into the center comes out clean.

White Chocolate Frosting
adapted from foodnetwork

*note: I doubled this recipe to frost the flag cake and had some left over

5 ounces good quality white chocolate, chopped fine
2 sticks (1 cup) unsalted butter, room temperature
3 cups powdered sugar, sifted
pinch salt
1/2 teaspoon vanilla extract
1/4 cup sour cream

1. Melt white chocolate over a double boiler or in microwave. Set aside to cool.

2. In the bowl of an electric mixer fitted with the paddle attachment, beat the butter until light a fluffly. Slowly add the powdered sugar until well combined.

3. Add the salt, vanilla extract and sour cream and beat until very smooth.

4. Add the melted white chocolate and beat just until combined.

Now for the fun part!

As for how to assemble this cake, Elissa did a great job of explaining it on her blog. I'm going to break it down for you:

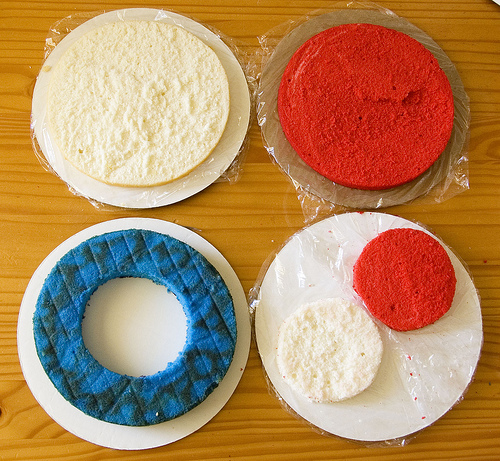
1. You'll have 3 cakes - red, white and blue. Using a serrated knife or cake leveler (best bet to getting even layers!) cut both the white and the red cakes horizontally so that you now have two layers of each. Set aside one layer of both the red and the white - these will be the two bottom stripes of your flag.

2. Stack the remaining red and white layers and place the blue cake on top.

3. Place a bowl or any circular guide (approximately 3 or 4 inches in diameter depending on how big you want your blue square to be in each slice) in the center of the stacked cakes. Cut around your guide through all three cakes.

4. Discard (read: eat) the inner circle of blue and the outter rings of the red and white. You will then have an outter ring of blue cake along with two small, round red and white layers. Looks like this:


5. Frost your bottom two layers of cake (red and white) then place your blue ring on top of that; spread a thin layer of frosting on the inner circle of the blue ring. This will help stick the blue and the top two red and white layers together.

6. Frost the middle of the two small red and white layers; being careful to pay attention to the way you've already stacked/frosted the bottom two red/white layers, place the small red/white layers into the center of the blue ring.

7. Frost the outside of the cake. (You may want to use a crumb coat first, to keep your frosting white and crumb free).


Set aside some extra time for this incredible masterpiece...
Happy Baking!!!!

(If I decide to make this cake, I vote for the cake mix and ready made icing...this one is a challenge!)

Wednesday, June 22, 2011

4th of July Ideas


This is a cute 4th of July idea
Add some Firecracker Spark to any Cocktails...

"Pop Rock Rimmed Cocktails"

they will make a crackle pop to your drinks when you take a sip.
Simply dip the rim of your glass in lime juice, then dip into the pop rocks.
This drink was rimmed with the Blue Pop Rocks, and a cranberry cocktail.
I saw this on Pizzazzerie.com


"4th of July Ice Cream Sandwich Pops"
Super Easy and cute
Family Fun Magazine always has cute holiday ideas

Ingredients
Mini ice-cream sandwiches
Sprinkles or nonpareils
Colorful cupcake liners

Instructions
First, skewer mini ice-cream sandwiches on popsicle sticks.
Then, press the exposed filling into a plate of sprinkles or nonpareils.
To keep mess to a minimum, serve the pops in colorful cupcake liners.
"Watermelon Stars on a Stick"

Ingredients
Watermelon
Popsicle sticks
Star-shaped cookie cutter

Instructions
Use a cookie cutter to cut juicy star shapes from 1-inch-thick slices of seedless watermelon.
Insert a Popsicle stick into each star, then set the pops on an aluminum foil-lined baking sheet.
Cover the stars with another sheet of foil and freeze for 1 hour or until firm.


"Red White and Blue Strawberries"

Ingredients
12 ounces white chocolate chips
Strawberries
Blue sugar or edible glitter

Instructions
Melt 12 ounces of white chocolate chips in a microwave according to the package directions (make sure the container and the berries are dry; even a little moisture will alter the texture of the candy).
One at a time, dip strawberries into the chocolate and then into blue sugar or edible glitter.
Set them to harden on waxed paper.
Makes 35 to 45 decorated berries.


Wednesday, June 15, 2011

Airplane Travel with Children


I am a Flight Attendant (Yup, asides from Mommy, Wife and Domestic Goddess!)
I saw this adorable, clever post on
BirthdayGirlBlog.com

I love this idea not for your child (children) but a little "bribe" for the "Lucky" folks who happen to be seated next to you who want to sleep, read,work, watch a movie or relax!

There are free printables for these cute tags!

 click here for "he/she"  free printables
click here for "they"free printables

Happy Travels!

Saturday, June 11, 2011

Father's Day Party Idea (Free Printable Party)


Thank You Shindig Parties for this AWESOME, AMAZING, SUPER CUTE
Father's Day FREE printable party with cute ideas and decorations!

I already printed this out and can't wait to decorate.
I am just baking cupcakes and adding the cute ties to the top...


include in the free printable is a Tie-rific centerpiece idea...


Tie Toppers that say, Dad, Granddad, Step-Dad...

these mini ties are multi purpose, I am using the A&W Labels (see last post) also for the table, and will
include these little ties on my table


Update: you need to "Like" Shindig Parties to Go on Facebook
for FREE Link for Father's Day Printables!!!!
Go to Blog and Follow Directions (Change since original post)


Hopefully, these past few ideas will save you $ and make your Father's Day dinner, gifts, etc. unique and thoughtful...
Happy Party Planing.

Thursday, June 9, 2011

You're An Awesome Dad (A&W Root Beer) free printable


Another Free Printable for a cute Father's Day Gift.

Cut with a 3 1/2 inch circle punch (or by hand) and tie with a ribbon.
Cute and easy!
Also a freebie for a cute teacher's gift as well!


Lots of fun food ideas for Father's this year!

Wednesday, June 8, 2011

Father's Day "Snack" Gift Ideas


The First Gift Idea is from Nothing but Country

She used a recycled glass bottle with an added orange ribbon.
 This printable is a  DAD, GRANDPA and then 4 generic ones for those special Father’s in your life. Even great for friends!!

She used a 2 1/2 inch circle punch for the tags. Or you can cut it out by hand as well.

This is from Martha Stewart

Ingredients

3 cups toasted corn cereal, such as Chex
1 1/2 cups bite-size pretzels
1 cup salted dry-roasted peanuts
2 garlic cloves
1/2 teaspoon coarse salt
5 tablespoons unsalted butter
2 tablespoons Worcestershire sauce
1 1/2 teaspoons paprika
1/4 teaspoon cayenne pepper
1/4 cup fresh rosemary
Directions

Preheat oven to 225 degrees. Combine toasted corn cereal, pretzels, and peanuts in a large bowl. Mince garlic and mash into a paste with salt. Stir together garlic paste, melted butter, Worcestershire sauce, paprika, and cayenne pepper. Pour over cereal mixture; toss to coat using a rubber spatula. Spread mixture evenly on a rimmed baking sheet. Bake, gently stirring every 20 minutes, until toasted, about 1 hour 20 minutes. Add rosemary. Bake for 20 minutes more. Let cool completely.

Cook's Note

Mix can be stored in an airtight container at room temperature for up to 10 days.

He'll go nuts for personalized pistachios -- or pickles or hot sauce. In fact, these retro labels make it a cinch to turn any of Dad's favorite foods into a custom gift for Father's Day.

How-To
1. Download our designs. Print them onto plain or self-adhesive paper, enlarging or reducing the size as desired. 

2. Affix labels to cellophane bags filled with treats, jars of homemade goodies, or store-bought products. Use double-sided tape if your labels are on plain, not self-adhesive, paper.


Add some cool beer bottles to a Galvanized Tub or a Big Cool Basket....it's Party Time!

Happy Father's Day