Thursday, September 29, 2011

Owl and Spider Rice Krispie Treats (Cocoa Pebbles)


Halloween Goodies made with Rice Krispie treats (actually Cocoa Pebbles treats!) 

The thing about these treats is they’re super simple, the kids will love them, they are a no-bake treat , and they look like spiders and owls.  
First you need to make your krispie treats.  You use Cocoa Pebbles instead of rice krispies.

Simple Recipe for Cocoa Pebbles Marshmallow Treats:

6 cups Cocoa Pebbles
1 (10.5 oz) bag of mini marshmallows
1/4 cup butter
Spray a 9×9 pan lightly with cooking spray
Melt butter over low heat in large saucepan
When butter is melted stir in your marshmallows until melted.
Remove from heat and stir in your Pebbles.
Press into prepared pan.
Let cool for 15 minutes and cut using knife or cookie cutter.
Number of servings (yield): 12
make treats then use a 2 inch cutter to make circles

for spiders:
Then you’ll need some pretzel sticks, mini marshmallows, a black food writer and if you’re feeling extra creative I used vanilla Tootsie Rolls (flattened for fangs)

Using a rolling pin, flatten the mini marshmallows…

Then you can cut your fangs from the Tootsie Rolls


Now for the adorable Owls
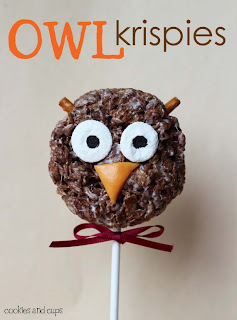
You make them just like the spiders…same eyes and all…just no fangs or legs.
I used an orange Tootsie Roll for the beak…


Break two pretzel sticks and put them in the top like ears or horns…which I totally know owls don’t have horns but it  just made them look more Owl-ish, this is not science class, people.

This adorable tutorial is from


Wednesday, September 28, 2011

Tailgate Baby Shower!

I recently got the nicest email from Taylor Etchison, she is a graphic design artist and creates creative, fun, and unique Invitations.

she writes:

"I wanted to share with you the invitations I recently made for my upcoming baby shower. Not really into traditional baby showers, I begged my family and friends to do something a little different. So in October, we're going to tailgate at my Alma Mater's homecoming football game! We're calling the party "Beer, brats, baby."

I love her color combinations!
Here is her design for her Baby Shower Tailgate Party..."Beer,Brats,Baby!"


She wanted to capture an athletic theme that paid homage to the school the couple loves so much, without any tacky colors or football turf. The balance she found was to go vintage — really vintage. The invitations are designed around a 1900s football theme. The four-panel invitation opens up to reveal all kinds of helpful information about lodging, things to do if you don’t like football (or BG, I guess!), directions and shuttles.


The RSVP helps carry the old school feeling through, with a photo of a real 1900s game, leather helmets and all, gracing the back side.


I can't wait to see photos of this creative and fun Baby Shower!
photos and website: TaylorEtchison,wordpress.com
etsy store for more designs:Etsy designs/Taylor Etchison


Monday, September 26, 2011

Football Tailgate Party with Custom Team Labels

Here is another Football Tailgate Party.
This cute Party found at Amy's Party Ideas, has the links to order her cute labels and party flags.
The labels and party flags are DIY printing and can be custom made for your favorite team.

This tailgate party is planned around the team colors and her foods match the colors! Go Orange and Blue! I love the fruit salad...this is  because my team colors are also
ORANGE and BLUE....GO GATORS!!!


Saturday, September 24, 2011

Football Tailgate Party Ideas

A follower on this blog emailed me with a special request for ideas for a Tailgate party.
I have been thinking about this idea for some time and couldn't wait to re-post this fabulous Tailgate Party I originally saw posted on Amy Atlas' Blog. Mirabelle Creations is the creator of this festive party. This original party idea could easily be adapted with your  team Name and Colors....


for more details, and instructions on how to make her Tailgating Chandelier click here
All I can say is "Go Big Blue!"


Thursday, September 22, 2011

Fall Leaf Candle

Friday is is the first day of Fall!
How to make a Fall Leaf Candle!
All you need to make one:  dried, pressed fall leaves, regular Mod Podge, a jar and a brush.
  Dry beautiful, colorful fall leaves using this method. Drying should take only about two weeks.
Smear Mod Podge all over the sides of the jar.  Do not apply Mod Podge to the bottom or the grooved lid area.
Place your dry leaf right onto the Mod Podge and press into place.  Brush over the leaf with more Mod Podge.
 Continue adding leaves and Mod Podge until your jar is covered with leaves.  I like to overlap a few, but keep in mind that overlap areas do reduce the light that can pass through.  I find that lighter colored leaves work best.  Use the darker leaves as accents.

 Once you have finished placing your leaves around the jar surface,  use the flat end of your brush to create a stippled pattern in the Mod Podge areas NOT covered by leaves. This step will create a more pleasing pattern than will brush strokes when light shines through these "open" areas on the jar.

 Let the candle dry thoroughly and then apply a second coat of Mod Podge, again "stippling" the open areas.

 Let the jar dry several hours or overnight.  Overspray with acrylic spray. When dry, pop a tea light in the bottom and you are done!
Keep this cute candle idea from Gingerbreadsnowflakes.com in mind once the leaves begin to change...
I am thinking that several of these, in different sizes, would be gorgeous on a Fall Party table.  And you can continue using them right through Halloween and  Thanksgiving.


Monday, September 19, 2011

Beer Tasting Party

Sunday was the official start of  Oktoberfest!
I saw this party at Decorating Obsessed and I have been wanting to re-create this party for a long time.
I love all her details, especially the printed napkins pictured at the end of this post!
Some of the ideas and details here would be great paired with your favorite football team...


PARTY DETAILS, as told by Ashley…

“I had a beer-tasting party for my husband’s 30th birthday party.

 The concept was simple: guests brought a 6-pack of beer in one of the following categories: ale, lager or stout/dark.

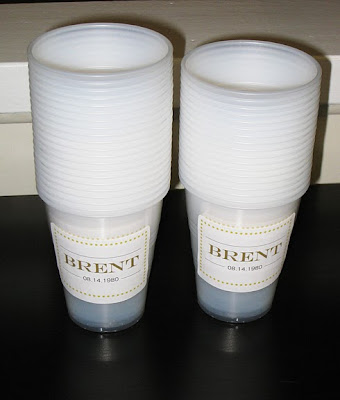
Each station was in a different area of the house, and people were free to try whatever they wanted, whenever they wanted. Each station was equipped with cups, napkins, a bottle opener, place for beer caps, and a place to take notes about beers they loved or hated. The sample cups gave people the opportunity to pour some of the beer into a cup, instead of drinking the entire bottle. We also had a pony keg of a Kansas City local favorite (Boulevard Wheat) on tap.

We ended up with about 15 different beers at each station, and it was a fabulous time. We plan on turning this party into an annual Octoberfest event!

For food, I did a bunch of bar food type appetizers – buffalo chicken dip, taquitos, jalapeno poppers, chicken enchilada dip, beer dip, etc. Downstairs I did a snack bar with spicy nuts, mixed nuts, pub mix, tobassco popcorn and seasoned oyster crackers. At the dessert bar was cake, mini cupcakes and brownies. The bottle cap cake was rocky road with cookies ‘n’ cream filling. The mini cupcakes were strawberry, lemon, carrot and peanut butter. And the cream cheese brownies were made by my amazing grandmother!

My favorite pictures are from the day after, when we lined up all the empty beer bottles on the bar.”