Sunday, April 29, 2012

Dessert Tacos for Cinco De Mayo (or any day!)

Dessert Tacos!
Cinnamon Sugar Dessert Tacos
Adapted from Ericasweettooth.com

Ingredients:
Flour tortillas
Cinnamon
Granulated sugar
Butter flavored spray
Tin foil

- Preheat oven to 350 degrees and line a baking sheet with tinfoil
- Take large pieces of tin foil (one for every taco you plan on making) and shape it into a thick "C"
- Mix together the cinnamon and sugar and pour onto a plate
- Spray both sides of a tortilla with the butter spray and coat both sides with cinnamon sugar
- Fold tortilla in half and place tinfoil "C" inside so the taco maintains its shape during baking
- Bake for 15 minutes, flipping them halfway through
- Allow tacos to cool completely before filling with your favorite ice cream and toppings

Strawberry and Banana "Pico de gallo"

Ingredients:
chopped strawberries
hopped bananas

Toppings:
Ice Cream
Whip Cream
Chocolate?

Dessert Taco Bar???
Endless Ideas!!!!!


Friday, April 27, 2012

Mini Chili Pepper Pinatas and easy tutorial

Little Mini Pinatas 
Made from Crepe Paper!!!
Fill with Hot Tamales or any treat you want!!!
Here is a cute tutorial from PartyPinching.com

1. Place a 7" or 8" salad plate on cardstock and trace around the plate.  Cut the circle out of the paper and cut in half.
2. Form cone and secure with tape.
3. Wrap cone with green tissue paper, taping the bottom. Fill with your choice of candy (I used Hot Tamales).
Twist the top of the tissue paper to form a stem.
5. Using red crepe paper, make small cuts halfway through the paper to create fringe.
6. Carefully wrap the fringed crepe paper around the cone, securing it with a glue stick while wrapping.
7. Continue wrapping until you reach the top. 

If you substitute the red crepe paper for orange, they make cute little carrots for Easter too!


Little Treats for Cinco De Mayo!!!!


Tuesday, April 24, 2012

Cinco De Mayo Decorating Party Ideas

It is almost May...
It is time to think of Cinco De Mayo Party Ideas!
Here are a couple of cute ideas to decorate any Mexican Themed Fiestas!!!!
I love this cute back drop idea...TACOS on a string!!!!
Martha Stewart.com always gives us pearly perfect ideas
I love the simple mix of colors on this table
This wedding is beautiful..from 100 layer cake
I love the colorful paper streamers
This back drop could be used for any party!!!
a simple idea...re-use colorful cans for vases
a FREE Cinco De Mayo Party Banner!!!

Happy Planning!
xoxo

Saturday, April 21, 2012

Happy Earth Day! Earthworm Cupcakes!

 Happy Earth Day...Remember Every Day is Earth Day...
How cut are these?
Earth Worms! Why didn't I think of this??? I love this idea, and if only I had extra time, I would make these for Earth Day!!!! These are from The Partyologist (love the blog name, too)
"Inching Along, she shares instructions and a FREE Inch Worm Printable.

to make  cupcakes:
Canning jars sprayed them with Pam.  Make a chocolate cake and put the batter in the jars.  Bake them,  After they cool, top them with dirt colored frosting mixed with OREOS.
to make adorable inch worms:
Bake up some cookies, add the black antennae.  Using the grass tip start piping two colors of green fuzzy fur on the Caterpillar.  Add eyes and a mouth and then stick it in the cupcake! 

Free Printable!
click HERE
Happy Earth Day!

Wednesday, April 18, 2012

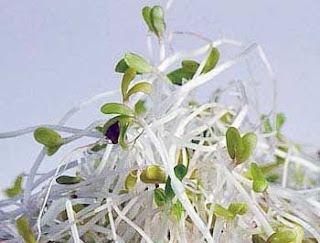
Growing sprouts from a Jar

We decided to grow Sprouts!

Growing Green for Earth Week!
We are growing alfalfa and bean sprouts using a jar

What You Will Need:
Quart sized glass jar (the kind used for canning)
Alfalfa seeds or any other sprout seed (I bought ours at Whole foods)
Water
Screen, woven material or old pantyhose
Rubber band, string, or jar lid (just the ring part)

How to Grow Alfalfa Sprouts:
It’s often best to start small and continue to grow sprouts. They quickly grow and you don’t want to have too many when you first start eating them.
Begin by placing 2-3 tablespoons of seeds into the glass jar.
Prepare the top of the jar by covering it with the woven fabric, screen, or hose. Keep the cover secure with a rubber band, string or lid ring.
Cover the seeds with water. Fill the jar with water to a height of 1-2 inches above the seeds.
Set the jar on the counter and allow the seeds to soak overnight.

After the seeds have soaked overnight, remove the water by simply turning the jar over and allowing the water to drain through the cloth. Ensure that all the water is out or it may cause the seeds to rot. Do not remove the seeds from the container.
Roll the container around to distribute the seeds all around the outside and let it remain on its side.
The sprouts will grow best in slightly warmer temperatures, but do not need sunlight at this point.

Rinse the seeds and jar everyday with cool water, twice a day if the temperatures are warmer. This step is important to remove any disease organisms or toxins that may accumulate in the jar while it sets. If a funky smell develops in the jar, you need to rinse it more often.
Continue rinsing for 4-5 days until the sprouts are ready to harvest. Typically the sprouts will be between 1-2 inches in length when they are ready to be harvested.
Simply give them a good rinse and shake away any excess water.

After 4-5 Days:
Spread the sprouts out on a tray or plate and place them in the sun for a short while, only 15 minutes or so. This allows the leaves to turn greener and important enzymes to become activated.
They’re ready to use immediately on salads, sandwiches, soups, dips – whatever you please!

Additional Tips and Advice
Not all water is fit to drink, much less grow sprouts. Ensure that you use quality water to keep your sprouts as healthy and nutritional as possible.

Use Organic seeds! If you are growing your own anything, make it as healthy as possible!!!

If you want to remove the brown seed coats, simply place the sprouts in a bowl of water, swish them around a little. The seed coats will float to the top where you can easily remove them.
To keep your sprouts fresh, store them in the refrigerator.


Grow your own Veggies makes them taste better!!!!
xoxo


Tuesday, April 17, 2012

Earth Day Cake

This awesome Earth Day Cake is made by MadebyStephanieLynn.com
I love it and will be making a version of this on Earth Day!
Make you favorite cake batter and divide.  Tint equal amounts of batter green and blue.
Scoop spoonfuls of each color batter into your pan. She used half of a Sports Ball Wilton pan for the globe shape, however you could easily use a round pan as well.
Continue adding spoonful scoops of batter alternating colors until your pan is 3/4's full.

Bake as directed and like magic your own yummy Earth to enjoy!

It looks amazing....
You can make up cakes as well...
Earth Day is Every Day!

Sunday, April 15, 2012

Free Earth Day Posters!

Recycle Your old Frames and Print one or both of these awesome
Earth Day Prints!
click here for top print

click here for Love Earth Print
Thank you Nothing But Country!!!

p.s. print on recycled paper!

Saturday, April 14, 2012

Method Cleaning Products are Safe and Eco Friendly!

I rarely recommend a name brand product...
But, since we are celebrating "Earth Day"...

I LOVE Method cleaning products!!!!

Their products clean without toxic chemicals, are safe and eco-friendly, and come in well-designed packaging.

Method Brand's Products are:
made with biodegradable ingredients
non-toxic
not tested on animals
packaged in recycled plastic bottles


also great laundry detergent, hand soaps and more....
Here is their web site: Methodhome.com
and click here for a $1.00 off coupon at Target

Thursday, April 12, 2012

Recycled Party Tassels

Here are some amazing ideas for an Earth Day Party from One charming Party and Paging Super Mom!

Keeping with our theme of recycling, I love these recycled Party Tassels!!!
I will start saving chip wrappers now!
Have you noticed the fun tassels that seem to be popping up everywhere lately? We’re loving them. Most are made from tissue paper or metallic mylar paper. In honor of Earth Day we re-purposed chip bags, old maps and used tissue paper into a festive party decoration. Here’s a tutorial from Paging Super Mom...

Begin by washing your empty chip bag with soapy water, which will remove any greasy residue. Take your clean, dry bag and trim off the bottom seam. Next cut the bag open along the back seam.
Lay the bag flat on a cutting mat then, using a straight-edge and craft knife, trim off the bags’ top seam. You now have a nice sheet of mylar, printed on one side but shiny silver on the back. Fold the bag in half with the printed side inwards. Beginning approximately one-inch down from the fold, cut your bag into vertical strips that will create the fringe of your tassel. Once cutting is complete, unfold and lay the cut bag horizontally so you have fringe on both sides. Carefully roll up (again with printed side inward).
Place one hand just above the slits on either side of the bag. Begin rotating your hands in opposite directions (the same way you’d wring out a towel) winding the mylar into a tight twist. Bring your fingers together and the twisted material will begin to twist onto itself. For the map and tissue paper tassels we made, this twisting action was enough to hold the tassel together; however, due to the slippery nature of the chip bags’ material we found it necessary to use a twist-tie to secure our tassels. Tape, hot glue or wire would also work well. Thread string through the open loop at the top of the tassel to hang!
See the rest of some Earth Day party ideas, including how to make a recycled map party hat, a globe, and a cute party printable invitation at OneCharmingParty.com.