Saturday, July 28, 2012

Olympic Opening Ceremony Party and Olympic T-Shirt Tutorial

Let the Games Begin 2012!!!!
4 Years ago one of my first blogs was the Summer 2008 Games!!!
Blogs, parties, foods, activities have gotten a lot fancier in the last 4 years.
Tonight was an easy night my daughter had a sleepover and we watched the games and made Olympic T-shirts. the T-shrt tutorial is later in this post.
I had to make these Olympic Canning Jars
Easy cupcake design, M&M's for the Rings (Brown M&M is the black One!)
The cupcake toppers were from a previous post
These were part of the Olympic printables
I made a Torch from paper and tissue paper
A last minute find...this was really fun, we played Opening Ceremony BINGO!
I found the Bingo Cards HERE

Olympic T-shirt Time!


 Supplies:
Plain White T-s (not the Band...)
Plastic Cups
Puff Paints
scissors
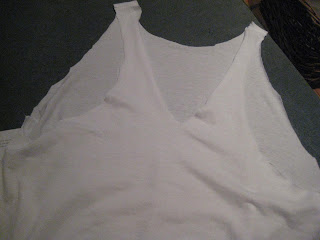
Step 1: Cut neck, sleeves and bottom (warning the t-shirt looks huge but it gets smaller with the tie)
Step 2: from the bottom cut away the bottom band so you are left with just the fabric.
Now stretch the fabric, keep stretching until you have t-shirt spaghetti!
Step 3: this gets a little trickier and you have to work with it to make it uniquely your own...
turn to the back of t-shirt and make a narrower racerback, and cut a deep v in the back.
(this is where you will use the spaghetti to tie it together)
Also you will probably had to tweak the front neckline and make a little lower to match the back...
get creative...
Step 4: cut your spaghetti so you have one long piece and start from the bottom of the V, and tie a knot 
Now wrap away!!!!


Now time to decorate.
Sticking with the theme of the evening: OLYMPIC FLAG T-shirt
Using the bottom of a cup
OLYMPIC Circles!!!!
E-A-S-Y


Our New Olympic Training Shirts!


Thursday, July 26, 2012

Olympic Printables and Great Olympic Decorations

It's Almost Opening Game Night!
I Love the Olympics...I also Love this great idea for a perfect centerpiece for "Olympic Night"
NoBiggie made these clever jars from Ball Jars and extra rings
With 5 different colors of glossy spray paint, five extra mason jar rings and a hot glue gun you can easily whip these up for a fun Olympic party night at your house.
including a FREE Team USA Banner!!!
Woo!Hoo!
Click Here and simply become a Bloom Follower, Like on FB, or Pinterest
and she will send you a link for a FREE Printable!!!


Tuesday, July 24, 2012

Olympic Torch Cupcakes

It’s not easy to be a torch bearer. You have to be nominated and only 8000 people in the UK were chosen this year. Oh, and you have to be inspirational…or something...
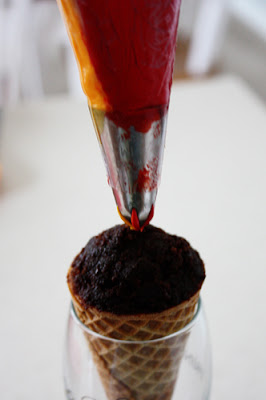
These “torches” are much easier to handle…and much tastier! They are sugar cones filled with a cake pop mixture with a fiery vanilla icing. You’re totally inspirational, so try one today!


Ingredients:
1 box of cake mix, plus whatever ingredients  are required by the mix (I used chocolate, but feel free to use whatever you prefer)
16 ounces of frosting that complements the cake mix (I used chocolate frosting for chocolate cake)
16- 24 sugar cones
16 ounces of vanilla frosting
Red, orange, and yellow food coloring
Pastry bag and 1M tip

1. Prepare the cake mix according to the package directions. Cool completely.
2. Crumble the cake into a large bowl. Add 16 ounces of your choice of frosting and mix well.
3. Gently spoon the cake mixture into a sugar cone. You don’t want it to break! Fill cone to the top, slightly mounded.

4. Divide the vanilla frosting into two bowls. Dye half of the frosting red and half of the frosting yellow.
 Holding the sugar cone in one hand, place the icing tip in the middle of the cone, squeeze, and pull away.
Keep it up until the top of the cone is covered with frosting.
6. Storing these suckers could be a challenge! I would recommend making these the same day you will serve them. You could refidgerate them overnight if needed. Their shape makes them a bit difficult to display, but I found this super cute idea for using an egg carton. You could also use wine glasses or a cupcake stand for serving.
pretend these are Olympic Torches!

awesome Tutorial, Photos and Source: Not Your Momma's Cookie!


Monday, July 23, 2012

Daisy Party by Darcy Miller

This Perfect Party is styled by Darcy Miller
 (Martha Stewart Magazines and Shows)

The best part is you can purchase some of the candies, and products she used for this party here at:


I love this idea of being able to see her work and then purchase the party details in one place!
Open Sky is an online shop that features her "party accessories"


Party Tips from Darcy!

Daisy Punch Lid & Jars – “Serve your drinks in style with daisy-cut Ball jars. These come in two sizes – I like the big ones for adult cocktails and the little ones for kids’ lemonade. Our yellow swizzle straw fits right in for easy sipping.”Click HERE to purchase


DIY Decorative Cupcake Stand Kit – “No matter where your party is, you don’t have to travel with your fine china – our cupcake stand packs flat and travels light– put it together in a few minutes and create a great centerpiece! Use the Daisy Double Edge Punch to transform this solid white cupcake tower into the perfect peice for your Daisy Themed Party.  Click HERE to purchase

Darcy’s tip: If your cupcakes have a lot of butter, put circles of wax paper liner down underneath to avoid grease stains on your cupcake stand. “


Darcy’s Daisy Lollipops – “When I set out to find a lollipop, I knew I needed something special – so I had this specially created for me! These adorable lollipops have pure white petals with a sweet yellow center. They come wrapped individually so you can put them on a place setting, send guests home with them, or fill a bucket or Mason jar for a pretty display.”Click HERE to purchase


Daisy Party Starter Kit (see table place setting) – “I’ve put together a collection of napkins, cups, flags and much more to help you one-stop shop for your very own daisy party! Your guests will be delighted by the little details on the tables such as the yellow swizzle straws.”Click HERE to purchase


DIY Party Favor Bundle – “With this kit, you’ll be ready to assemble some fantastic party favors of jelly beans, sour balls, gumballs -- and we even have the bags ready for you! Let the kids have a party-duty in filling these bags with their favorite combo of theme-colored candy!Click HERE to purchase

My tip: stay away from melty chocolate if you’re having outdoor summer entertaining! These candies will hold up to the heat.”


Eleni’s Daisy Cookies – “Eleni’s creates these sweet daisy cookies which I love to put on top of vanilla cupcakes for a beautiful display on the dessert table.Click HERE to purchase

You can stack your cookie-topped cupcakes on our cupcake stand from Martha Stewart Crafts (included in this sale) or simply put out plates of these cute treats for your guests to nibble.”

Yellow and White Gumball Favors – “Have I mentioned that I love decorating with candy? These juicy gumballs and packaged for you in the tubes, ready to send home as favors, set as place settings – get creative! Use with the our (DIY Daisy Kit) to decorate these tubes with a daisy like I did!”Click HERE to purchase


Friday, July 20, 2012

Dollar Store Candle Makeover

Supplies:
Dollar Store Candle
buttons, sequins, glitter, sprinkles,etc
glittery puff paint
{not to be confused with glitter glue}
How-To:
stick all sorts of cute buttons and tiny rhinestones in the inside on top of glittery puff paint!

let it dry for an hour
{at least}
After it is dry,
 stick a toothpick into the bottom of the candle
this will help it stand up straight!


source and tutorial: Banmanland.blogspot.com


Thursday, July 19, 2012

Rice Krispie Ice Cream Cones

Look how cute these are!
Cute As A Fox made these! Click HERE for Tutorial!

Supplies Needed:
Kid Size Ice Cream Cones
Candy Melts or Almond Bark
Sprinkles
1 batch of Kellogg's Rice Krispies Treats(use the recipe on the box)
the Ice cream cones are mini cones found at Walmart


Source and tutorial from: Cute as a Fox


Monday, July 16, 2012

Chalkboard Drawing and Tips


Have you seen the beautiful chalkboard drawings?
I love them!!!! I found this tutorial from InMyOwnStyle.
I can't wait to practice, my chalkboard writing needs some help!!!

I re-posted the basics, for more info and tips click here.
For the basics:
*If you are using a brand new chalkboard – season it first. This will help lessen “ghosting”.  Ghosting is when you draw on a chalkboard and after it is erased – you still see the images, but in black.   To season a chalkboard:  Use a full piece of chalk and run it on its side over the entire surface of the chalkboard.  Make sure to rub it in well.   Once the board is covered – erase it.   It is now seasoned.

*Most important tip:  Don’t use dry chalk.  Dip the chalk in water before drawing on the board. As you work, keep dipping the chalk in water to keep it wet.  At first, the chalk lines will look faded – not bright – be patient and let it dry – it will dry bright white or whatever color chalk you are using.   You can also keep the board wet and draw on a wet board.  I did both.

*Keep it simple at first – the more boards you create the better your drawings, centering, and lettering will become.

*Make a sketch  to determine placement of your images and words.  Pick one image to make the focus. In my art it was the cake and copy – Happy Birthday.

*Make a border – I used a square at each corner and double lines. I then filled the double lines in with dots of color.

*Mix up font styles – Thick, 3-D, thin, serif, shadow, and script. A good rule of thumb is to use no more than 3 fonts.  One heavy print font, a script font, and one thin caps font.

*To find the center of a word or words – count the number of letters and spaces between each word.  For instance “Birthday” has 8 letters – no spaces, so the 4th letter “T” is the center.   If I wanted “Happy Birthday” all on one  line.  The letter/spaces count would be:  14 – making the  “B” the center point.  Capital letters take up a bit more room, but this is a good rule of thumb to center lettering.  Draw the center letter on your center point and then draw the other letters to complete your word. This is the hardest part of chalkboard art – making free hand letters. Some letters will be bigger and your centering will look off.  Mine is off, but it still looks OK  – not perfect – but fun and festive. Don’t try for perfection.  The imperfections can sometimes add to the charm of chalkboard art.

*Use colored chalk on the focus image or border.

*When you add the wet colored chalk over existing dry white chalk it will appear that the white chalk has been ruined. It has not – just wet and looks faded. When it dries it will look nice and bright again.
Gather supplies:

Chalkboard
Chalk – white and colors
Bowl or glass of water
Damp rag – Do not use paper towels – they will leave a fiber residue on your board. I used a Handi-Wipe.
Q-Tips – dipped in water are the best erasers to get into tight spots and fix mistakes.
Sewing measuring tape or ruler
Computer fonts or art print-outs, clippings, or stencils to use as visual guides
Sketch pad and pencil


1.  Clean board with a wet rag. Repeat to make sure you are getting as much chalk residue off the board before starting your drawing.
2. Use the tape measure to find the center of the board – width and height.  You can draw a faint line down the board to help guide you and erase it later with a Q-Tip.

3. I like to do the border first as it helps guide me on how much space I truly have to draw on.   Use a ruler to make straight lines if needed.

4.  Using your sketch as a guide, start drawing your focal image. If you mess it up, just wipe it away and re-do it.
5.  Add in the rest of the design.
6. Add the color last.  Remember the white chalk around the newly applied colored chalk will look like it faded since water touched it after it was dry. Just let it be, it will dry bright white again.
7.  Erase mistakes and smudges with the tip of a wet rag and/or Q-Tip.

8. Let dry and display.

With a little practice and a few imaginative ideas you too, will be on your way to creating fun and festive chalkboards to use for entertaining or to add some of your personality when decorating your home.  Decorative Chalkboards can truly add a festive personal touch to your surroundings.