Monday, August 8, 2011

Fast and Easy Cake Pops

I first tried Cake Pops using one of my favorite books "Cake Pops" from Bakerella, and they were not too pretty....
I have to say, I spent hours with many broken cake balls and a huge mess!

Then I found this video from "cooking with Sugar, Easy cake pops"
and I was so excited!!!!

Now, I have a reason to smile and try to make these cake pops!!!
(Tomorrow, I am going to make these for a small birthday party)

in the meanwhile, here is  a tutorial for Fast and Easy Cake Pops


1 pack of doughnut holes
1 pack of melting chocolate
1 pack of lollipop sticks


Supplies (white styrofoam board to hold pops in)

Directions

When ready to assemble heat candy melts in a small bowl in the microwave according to the directions on package. 

Dip the tip of a Popsicle stick into the melted candy . . .
Place them in the refrigerator of the freezer for a minute or two so that the candy sets on the stick. Then remove them and swirl the pops gently into the melted candy and coat well.

Allow them to drip for a moment and then dip into or sprinkle on colored sprinkles. Set into Styrofoam to harden.


Tuesday, August 2, 2011

"Conversation Starters" Tutorial

I found this cute tutorial for "conversation starters"
This ideas could be used for a birthday party, baby shower, bachelorette party or any party...


This is from Create Studio
click here for tutorial

Some of the questions she used:

What's the funniest thing you and Anna have done together?
What is your favorite memory with Anna?
Tell the story of how you met Anna.


Tuesday, July 26, 2011

Girls Camping Party

Now that we are on the theme of Camping Out...I found this awesome Girls Camping Party on
Hostess With The Mostess
"Camp Out! Girls Birthday Party"

Here are a few of my favorite Photos

 How Beautiful is this... I love the Quilts, bandanas, clothes pins, signs....


A Cute way to serve s'mores


S'more cupcakes


s'more pops...coat marshmallows in chocolate then dip in graham cracker crumbs


Happy Trails to you....

p.s. I hope you like these ideas, Barbarann!

Monday, July 25, 2011

"Camping Out" Camp Fire Cake


Camp Fire Time

I LOVE this cake for camping out!

Thebirthdayblog.net posted this cute tutorial for making the fire for this "Camp Fire Cake".
The logs are Pepperidge Farms Cookies (how clever)
and here is how she made the fire:
While the cake is baking, make the candy part of this cake. Place 1/2 cup of sugar, 1/4 a cup of corn syrup (Karo syrup) and 1/8 cup water in a sauce pan and brought  to a boil. If you don't have a candy thermometer, use this trick,  have a bowl of ice water next to the stove and when it starts to get thicker and you think it might be ready, use a spoon and put a little in the water. If it hardens and cracks when it breaks, then it is ready. If not, stir a little longer and then try again.  If you want a more exact way or if you already have a thermometer then it needs to reach 295 F. Add the coloring at the end . Do not mix the color, try to get the color to vary a little. Pour it onto tin foil on top of  a cookie sheet. Cool before removing from foil.


p.s. don't forget the camp fire songs...and scary stories!!!


Wednesday, July 20, 2011

Popsicle Party Ideas

I just was reading the new Martha Stewart Magazine and fell in love with these cute invitations.
I love these Popsicle invitations and a great Party Theme.
Click here for a complete tutorial with free downloads for invite, envelope and mailing label with sprinkles...thank you Martha, you are amazing!


I was given a Zoku Pop Maker and I love it!
We keep it in our freezer and use it often.
It is so easy to use and clean,and your popsicles are ready in minutes! I consider this a "must have" item.
There are endless combinations of fruits and juices you can use and you know they are healthy because you make them. No added sugars or preservatives.

You can buy them from here or Williams-Sanoma.com


Click here for Recipe for Pineapple Coconut POPS from Zoku.com


AND HERE IS A GROWN-UP ONLY RECIPE

Mai Tai Tiki Pops

Stay cool and enjoy Summertime!


Saturday, July 16, 2011

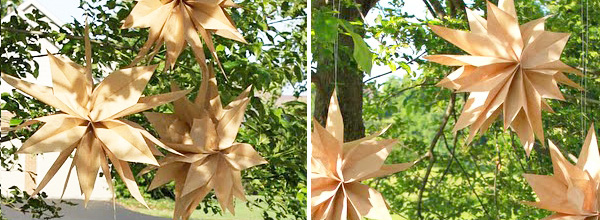
Brown Paper Bag Star Tutorial

I Love this cute tutorial on making "Party Stars"

This is from Mirabelle Creations (I saw this on Hostess with The Mostess)

I really like the color of Natural Craft Bags (Lunch Brown Bags) and have been loving burlap fabric lately....hmmm...I think this might turn into a party soon...
Let's brainstorm, craft paper, burlap, natural papers????

Anyways, here is the tutorial for these rustic looking stars.


You will need:
– 5 Gusseted Paper Bags
– Double-sided Tape
– String
– Scissors
– Hole Punch.

Cut off the end of all of the paper bags.


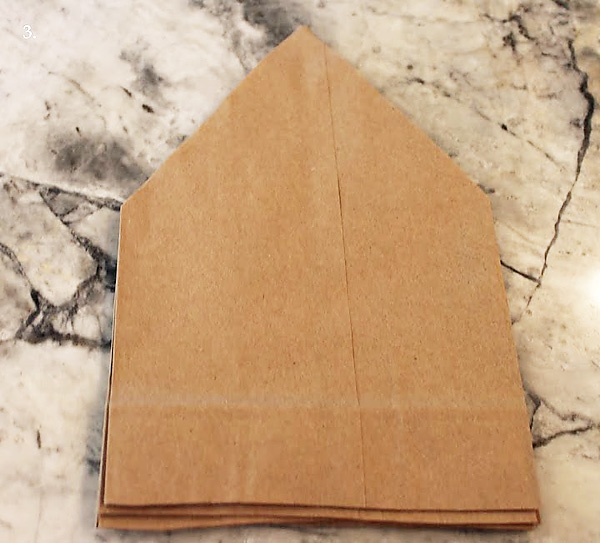
Stack all 5 paper bags and cut the other ends into a point.


Place two pieces of double sided tape on either side of each paper bag, near the ends.


Stack all 5 paper bags together and punch a hole in the bottom, middle.  Tie the bags together with string, not too tightly.


Join the two ends together to make your star.


You can also use white or colored paper bags in different sizes to mix things up a bit. Maybe even try making a GIANT version from grocery sized bags! That could be fun! 

Thursday, July 7, 2011

DIY: Chalkboard Platter (Notes or Menu Board)


I love my new Message  Board. I plan to use it at parties as a Menu Board, as well.
This DIY project was so easy and fun.
I bought a large platter from Home Goods for $9.95 and a can of chalkboard paint at MIchael's with a 40% off coupon and voila!

any plate, platter will do...the chalkboard paint sticks to tons of surfaces

Make sure to tape it off well, press the corners down real well, on the edge of the platter there is paper to protect the edges while painting


Please note, this was sprayed outside!!!! Not on my countertop!!!!


I couldn't stop spray painting, so I made this little jar. I even sprayed the top of jar with chalkboard paint!

Please Note:
Very Important...Let paint dry 24 hours before using chalk!!!!
you must use a felt eraser on chalkboard paint and do not use Side Walk Chalk, it scrapes the paint off.